In Wirecast, the shot layers properties are a menu system that allows for manipulation of the sources added to a project. The menu system is quite robust. Let’s dive in and take a look at the shot layer’s properties.
Position
The position area allows for direct input of numbers on the position of your media or source. The numbers will change based on the manual movement of the source. You can also input your numbers if you know exactly where the asset needs positioned.
Size
The size works similarly to the position. You can input a value for the sizing and the source will change to the desired number. This allows for a “fine-tuned” adjustment.
Scale
The scale wheel works hand in hand with the size. This wheel will allow you to get a perfect size without knowing what the numbers should be. When you move the scale wheel, your size will increase or decrease for the source. A lot of users tend to use this to find a great size, then write the numbers down to get to that size in future projects.
Scale to Fit
There are two buttons below the scale wheel. One is called “Scale to Fit.” This allows you to take a source that doesn’t fit the canvas size, and scale it proportionately to fit the height and width of the canvas, without distorting the source. If you’re using the other features and lost your way, a quick “Scale to fit,” allows you to get back to an undisturbed image.
Reset Position
The reset position is the second of the two buttons under the scale wheel. It looks like an arrow that is round. Clicking this will bring your source back to the original size it was imported into your Wirecast project. An example of this is if your media is 4:3 but the canvas is 16:9, it will reset it to the original size, without fitting it using one of the “Fill” options which we will talk about here in a second.
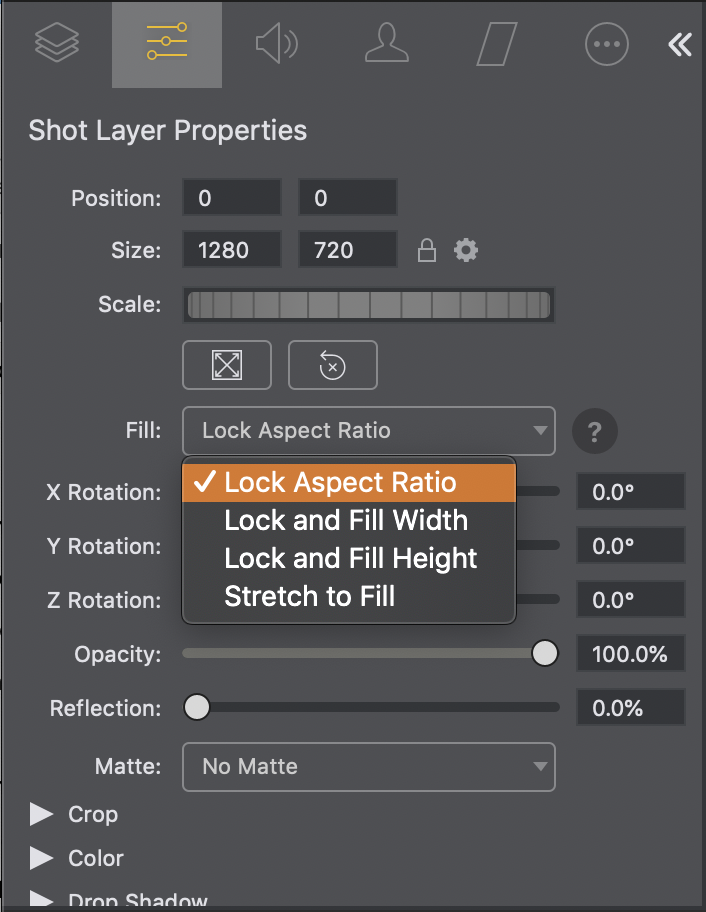
Fill – Lock Aspect Ratio
Fills the bounding box until one side hits the edge. Will respect the aspect ratio and will not crop your media.
Fill – Lock and Fill Width
Fills the bounding box to its width. Will respect the aspect ratio, so media may end up being obscured top to bottom if your bounding box height is less than the media height (or will have letterboxing if the bounding box is larger)
Fill – Lock and Fill Height
Fills the bounding box to its height. Will respect the aspect ratio, so media may end up being obscured on the sides if your bounding box width is less than the media width (or it will have pillar bars on either side if the bounding box is larger)
Fill – Stretch to Fill
Fills your bounding box, does not respect the aspect ratio of media, so may end up distorting your media.
Note: The Fill feature is not active in Clock, Text, Solid, QR Code, or Web Page shots. In these shots, the image automatically stretches to fill the bounding box.
X Y Z Rotation
Slide the X (Horizontal), Y (Vertical), or Z (Straight-through) axis sliders to rotate the source in the direction you wish to rotate.
Opacity
Slide the Opacity slider to adjust the degree of transparency of your image.
Reflection
Slide the Reflection slider to adjust the degree of reflection below your image.
Matte
A Matte is a border around a shot. Select a matte to be used by clicking the down-arrow on the Matte menu. Default is No Matte. You can also use any media file as a custom matte. To do this, create a new shot of the media file you want to use as a matte. This file now appears in the Matte drop-down menu where you can select it.
Crop
Click the Crop triangle to open the cropping adjustment pane. Slide the Left, Right, Top, and Bottom sliders to crop your source image. Reset Click the Reset button to reset the crop controls to their default settings.
Color
Click the Color triangle to open the color adjustment pane. Slide the color controls to adjust the color. Reset Click the Reset button to reset the color controls to their default settings.
Drop Shadow
Click the Drop Shadow triangle to open the Drop Shadow adjustment pane. Check the checkbox to enable the controls.
Color
Click in the color field to open the color palette. Select a shadow color and luminance by sliding the vertical and horizontal sliders. Click outside the color edit box to close the palette.
Angle
Move the Angle slider to adjust the direction (0 to 360 degrees) the shadow text is offset from the actual text.
Offset
Move the slider to adjust the distance the shadow text is offset away from the actual text.
Opacity
Slide the Opacity slider to adjust the degree of transparency of your source.
Blur Size
Move the slider to adjust the amount of blur in the drop shadow.
Use As Defaults
Click to set the current drop shadow configuration as the default setting. All future enabled drop shadows will be set this by default. Clicking this button does not retroactively update previously created shots. Drop shadow settings on individual shots can still be changed.
Reset
Click to restore the drop shadow settings back to the default values. You can also restore the drop shadow settings to Wirecast application defaults by holding the Shift key down and clicking Reset.
PTZ
Click the PTZ triangle to open the PTZ control panel.
Preset
Click the up and down arrows to find a PTZ preset to recall, then click the Right Pointing Arrow button to recall the preset.
Show PTZ Controller
Click to display the PTZ Controller panel.
We hope this helped you understand what the individual features are within the shot layers properties and it helps you create spectacular live video. We appreciate you reading our blog and stay tuned for more great blog posts from Telestream.